Showing posts with label toddler. Show all posts

Wednesday, April 15, 2015

Flexibility and Empathy: Chapter 5 of No-Drama Discipline

So here we are for the penultimate post about the round table read of No-Drama Discipline being hosted by Natural Parents Network.

In case you've missed the first posts (both here, at NPN, and over on Code Name: Mama) I found the book trailer! It's worth a watch, for sure.


So I'm going to talk about two of the topics they cover in this chapter: empathy and flexibility. I have long felt there's an empathy deficit in the world. Too many people are so focused on what they want that they fail to see what is needed for the person in question.

(Sidenote: One of my favorite posts ever about hospitality and empathy comes from Jana Riess writing for the Religious News Service - don't let that deter you - entitled: Everything I Need to Know About Hospitality I Learned From Molly Weasley. It's full of spoilers so don't read it if you haven't read the Harry Potter series yet, but this is the gist: her son brought home an orphan and she treated him as *he* needed to be treated, which was different from her own children. And within her own children, each was treated according to their needs and unique personality. She modeled empathy and flexibility for her children.)

From the book:

"The more we give kids the opportunity to consider not only their own desires, but also the desires of others, and practice making good choices that positively impact the people around them, the better they'll be at doing so...A collaborative and respectful redirection [is] worth the effort and extra time." p.139


Checking out the instructions

Here's an example with my 2.5 yr old: we purchased a 4billion piece LEGO set last year. When completed, it would be a Winter Village and part of our Christmas decorations...and let's just say that the "expert" label wasn't lying. We pulled out the instructions, opened the 50 bags as needed, and sorted pieces into neat piles by color. We used various prep bowls and empty yogurt containers to contain the piles. Baz and I would look a few steps ahead, collect what was needed into a ramekin, and pass it to Steve, who would assemble. Walter, who didn't intuit a job for himself past sorting by color, starting undoing the sorting, pushing pieces off the table, and generally being a pain.

Option 1: throw on a movie for him to zone out to while the "big kids" assembled the LEGO.
Option 2: scold, scold, scold.
Option 3: give him a job.


Not Sorting.

We settled on Option 3. His new job was to take the particular needed piece from the waiting ramekin and hand it to Steve - where he would either help press it onto the other pieces or he would reach for the next piece.

It seems like a small thing, but we all know parents who wouldn't have seen a place for the youngest child and would have tried to distract and then scold when the distraction didn't work. The bonus is that the next weekend, when we picked up to finish the assemblage, he also picked up where he left off - this time without the preamble of mess-making. It doesn't take a Master Empathizer to see that he just wanted to be included, the trick was finding the age-appropriate way to include him. It was an instance where we succeeded.

So...flexible consistency...or as the French call it: The "cadre" (frame)

"Consistency means working from a reliable and coherent philosophy so that our kids know what we expect of then and what they should expect from us. Rigidity, on the other hand, means maintaining an unswerving devotion to rules we've set up, sometimes without having even thought them through, or without changing them as kids develop." p 147
"Rigidity is about...fear-based parenting...parenting with a goal of reducing our own anxiety and fears, rather than what will best teach our child's emerging mind and mold the developing brain." p. 149 

Flexibility within the consistency removes your fears from the equation. The fears they're talking about here are the ones that worry any single indulgence will lead to a slippery slope of bad habits (cue the people who tell you not to hold the baby too much, or co-sleep, or let them indulge in a snack...I could go on and on...) without realizing that if you allow a bit of crazy now that doesn't mean you allow it always.


Helping Daddy on the second day of assemblage

Flexibility acknowledges that accidents happen. It allows for the occasional loss of temper. It allows for boundary pushing. It allows you to see that the reason your 2 year old is throwing LEGOs on the floor is simply because he want to be included. Flexibility gives space for the parent and child to talk about why it's not ok to throw pieces, and what would be a better activity.  Rigidity sees only the LEGOs on the floor and reacts to that infraction. Rigidity allows for no discussion, only consequences.

So your Goal is to be consistent but flexible. Empathize with your child to all your to better understand where he's coming from, and work together to find a solution that works for everyone and sets up the framework for the next time that situation occurs.

And seriously, folks, every parents and/or caregiver should read this book.


Finished Product. Not pictured: Santa's Sleigh (not part of the set.) 

Wednesday, March 18, 2015

Tantrums, Tantrums, Tantrums! No Drama Discipline Ch. 3

Baz, at about 14 months...
when I found this, I hugged him now...at 5 years.


And we're back for Chapter 3: From Tantrum to Tranquility

      I feel the need to point out that I am only scratching the surface with these posts. I'm building a whole post on one or two quotes I've pulled from each chapter - and those are picked from the dozen or so that I copy out, but even then...I'd underline the whole book if that wouldn't be super confusing. I really, really think every parent can benefit from this book. So pick up your own copy and read along! I'd love to know what you think, too.


     So my favorite acronym from this chapter is this: HALT. As in: if your child is freaking out (or whining...or clinging...), take a moment to determine if he is Hungry, Angry, Lonely, or Tired. Think about how well you behave when you are one of those four things...and then, as the Husband likes to say, "debug your child." If you are aware of these things and head them off, then you can stop a tantrum before it starts.

     Example: the boys are two of those things every Saturday after swim lessons. I keep snack bars in the bag for them to snack on in the car on the way to lunch. A snack and a little rest in their carseats gets them through lunch without incident. The one time I didn't give Walter a snack in the car...I was that mom sitting outside of Red Robin telling her screaming child that we can go back inside after he's gotten all his screams out because I won't let him scream at the table. I can't stop the screams, but I can remove him from the table and sit with him so that Hungry and Tired doesn't turn into Hungry Tired and Lonely (feeling dismissed because I won't hang out with him when he's cranky.)

       Obviously - this doesn't always work and obviously misbehavior still happens. This is when the authors remind us to truly connect with our children:

"Fight the urge to punish, lecture, lay down the law, or even positively redirect right away. Instead, we need to connect....[this]moves them out of a reactive state and into a state where they can be more receptive to the lesson we want to teach and the healthy interactions we want to share with them." - pp 72-74

Walter's reaction when I say "show me your mad face!" 
     A little bit later in the chapter they bring up what every critic of non-punitive discipline brings up: by not laying down the law (or even just spanking as an automatic response - I've heard that, haven't you?) you are spoiling your child. However, spoiling does happen. We all know what happens to children who are truly spoiled: they grow up to be entitled douchebags. And no one wants that.

"Spoiled children often grow up to be unhappy, because people in the real world don't respond to their every whim." - p. 91

So - how do you connect without spoiling? Connect, connect, connect.

"Connection is about walking through the hard times with our children being there for them when they're emotionally suffering, just like we would if they scraped their knee and were physically suffering." - p. 92 

We call this "Bereaved Planking" and it's a universal
toddler response to...anything they don't want to hear.
        Being aware, being proactive, and sitting with them while they let it all out - whether it's a broken heart or unbearable frustration or just pure anger - while they won't always get what they want, they'll get what they need: you, holding their hand when they need it. (Or, if you've read that poem - a place in their life where there's only one pair of footsteps in the sand.)

       Like I said above - this is the just the tip of the iceberg and I heartily recommend reading the entire book. We'll talk more about connection in chapter 4 (and the rest of the book, I presume.)

     Oh, and for those who think "I'll just ignore the tantrum and it'll go away" - I suggest you read this blog, on the author's home page.

I'm going to end this with a quote I can't attribute...but it's one of my favorites so if you know the source please let me know! (It's also possible I'm fully misquoting...)

You spoil a child the same way you spoil fruit: put it in the other room and forget about it.

Monday, June 3, 2013

Waffle Breakfast


A few weeks ago, I woke up to waffles in progress in the kitchen. I decided a practice shoot was in order. Here are a few of the highlights. (I need to figure out collage-making in PSE...any tutorials?)

I am so proud of him. His photos get better and better. He'll be second-shooting for me before you know it!

Steam. Skills:

BOOM! Kitty likes to eat breakfast with us most morning.

 A worthy spread. We just nuke frozen berries - the lazy girl's compote.


I'm pretty sure he took a picture of his plate. He dips his waffles into the little bowl of syrup.

Cutting practice. I've gotten some questions - his silverware *is* exactly like ours, just sized for small hands. Find them here.

 Time to eat!

 Fin. 

Monday, May 13, 2013

"Stained Glass" Bunting


Somewhere, I saw this tutorial - crayon shavings + wax paper = bunting.
So one night, while watching Downton Abbey, I started sharpening crayons into a muffin tin.

 The next rainy day, when we stayed in our pajamas, I pulled out the ironing board and the wax paper. 

Baz did the sprinkling.


Walter hung out, mostly happily, while we crafted the afternoon away.


I hung the post-ironing, pre-cutting sheets in the window to cool. 


Cutting triangles...


Some bakers twine and washi tape later, and we've got  super cute bunting in our play area. I really need to get a better shot, but it's...challenging. I'll post one when I get one. 


I've got at least a dozen triangles hanging out...more bunting? Pennants? The possibilities, while not endless, are certainly inspiring :-) 

Tuesday, March 5, 2013

PlanCity Toy Storage

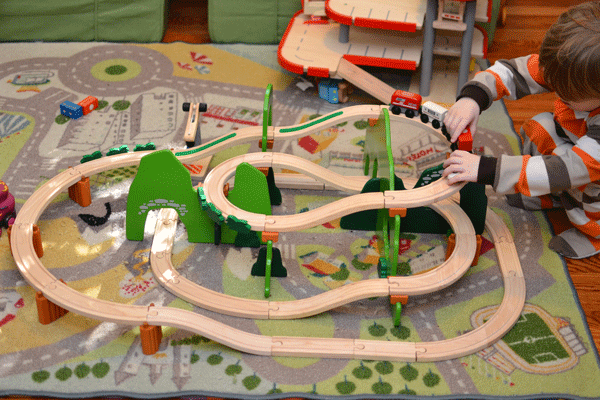
So we decided, when we were thinking about things, that Baz's toys were going to be as un-branded as possible. He's got Cars cars, and his daily PB sandwich is cut out in the shape of Mater and McQueen, so we're obviously not rigid, but his road and rail set is unbranded in such a manner. It's a blank slate for all of the imaginative play he can imagine. 

We chose the PlanCity set. It is amazing. It is well made and durable and, while each little set isn't terribly expensive, it adds up quickly.
 I want it to last - I want it to be loved, but I want it to last through both boys and potentially to their own children.


I googled storage solutions a LOT and found NOTHING. So I set my own up and am offering up these images and links to the next mom who wants to teach her children how to take care of their toys, because they are lucky to have nice things.

There's not a full shot of the table, which - in all honesty - is never fully cleaned off. It's the play table from Land of Nod - awesome for many reasons, not least of which that the legs are interchangeable and by the time it's all said and done, your kids have a desk on which to do school work.


The mountain and the mountain passes go in last. People, cars, trees, etc go into the two drawers in the table.


We opted to invest in the two rolling storage bins that match the table and one houses diggers, Cars cars, and farm animals (in these cuffed buckets - which are surprisingly sturdy. We have a 4th one out for Walter's rattles.) Bus stops, a crane, the fire station, etc - all of that goes in this bin.


This bin houses all of the road and rail pieces themselves - bridges, connectors, level crossings...all in here (the yellow envelope has assembly instructions for when we choose to follow directions.) I picked up drawer organizers in varying sizes and am very happy with how they work. 


Mountain curves go in next...


 And mountain pieces on top.


It all slides away so that (with the exception of the parking garage) you'd never know we had an entire city unless it was in the process of being played with. 

And before you get all "that would last 5 seconds and my kid would have destroyed it" snorty at me....I've taught Baz since he was Walter's age (and have heard him repeat to Walter already): "We are lucky to have nice things. We have to be gentle with them." So he doesn't put away without help, and when he does he likes to know that there's order to the madness. I help him put things in the correct bin and each time I help a little less. 

So - hopefully - this set will last us a loooong time. Because it really is quite awesome.

Disclaimer: None of the companies mentioned here know that I exist beyond their records of my purchases (Land of Nod has *excellent* customer service, by the way.) They do not care that I am an overly organized or that I've taken pictures and put them on the internet. I have not been paid, cajoled, bribed, blackmailed, or sweet talked into telling you to buy their products. 

Tuesday, February 26, 2013

Putting Indestructibles to the Test

A few years ago, when Baz was a baby, my mom sent us 2 books from a company called Indestructibles. They are, supposedly, immune to the abuse toddlers put books through. By the time we got them, I'd already been working with Baz to be gentle with books so he did not put them through the wringer.

 (tip: start with catalogues. If those get torn, no one cares, and they're more delicate than picture books, so by the time you introduce picture books, the bar has been set.)

Walter got them pretty early - and he's a kid who puts everything in his mouth (Baz, not so much.)


He just can't get enough of the amazing illustrations and the tasty paper. Trust me, he has been known to just gaze at the images, too.


These books have been put through the ringer. On the left - Humpty Dumpty gets some love, but Frere Jacques (about a chef who dreams of food) gets the most love. He crushes, chews, sucks, throws, peruses, and smashes. They are crumpled, but that actually makes them softer. The illustrations are not worse for the wear, either. 
Hey Diddle Diddle was Baz's - he reads it quite often. Note its near-perfect condition. I have a rather fastidious child.


I decided to put them to the ultimate test: ironing. I used the steam, a fairly high heat, and a linen napkin (you should always put something lint-free and color fast between your iron and whatever you're ironing, lest you over-heat the fabric and leave shiny spots or burns. Those are tell-tale wear signs and not acceptable at all....wonder where my 3 year old gets his fastidiousness from? ;-) )


After ironing - flat books again! 


Ok, so I found one chink in the armor of the virtually indestructible books: direct heat from the iron will melt the pages. I found this out when I was ironing and the cord of the iron pulled the napkin away. I do not recommend that. I'm pretty sure you could cut these with scissors, too, but I don't want to try because we enjoy these books!


So there you go - the perfect infant books. I want to make a point of saying these are the perfect car books - they're not hard or heavy like board books, they're not prone to tearing like paperbacks, and the pictures are colorful and inviting. We keep at least one in the seat pocket at all times.

For legal reasons I need to say that this company doesn't know who I am, that I ironed their book, or even that I own their books. They do not care that I melted Frere Jacques because they do not know that I own Frere Jacques (they may care if they ever find out, but who knows if that will happen. 12 people ready my blog.) They also would probably like to know that I HEARTILY recommend these books as gifts for the small ones in your life and that I feel the price (~$5) is well worth it. Find them at your local book store* or amazon.


*why shop local? Here's why. Seriously. Click through and read at least the cover page at the
You'll be amazed.


Wednesday, February 13, 2013

Monster Be Gone!


Do you have one of these living next door to you? A Macaw? The bird is beautiful, but its squawks are startling and jarring to an adult (when I first heard them I honestly thought something was being mauled) and they're downright scary to a small child.

Husband didn't help things when he coined it the Dinosaur Bird and made up this song: "Dinosaur Bird is gonna eat you!" Which he happily sang to Baz ONCE. 

We've been paying for it ever since.

Add to that a new fear of anything even remotely scary (scene not well lit enough in an otherwise mellow movie? TOO SCARY! Someone being snappish? SCARY! Women in a gas mask? SCARY!) and we've had a fun night pattern emerge.

Enter pinterest and co-workers.

It's not revolutionary, but kids are literal and so it's miraculously effective.

We made a sign:


It reads: NO Monsters or Dinosaur Birds ALLOWED!!!

Then we made some spray, just in case the sign isn't enough for the persistent ones: 


The California Baby spray bottles are the best. And the Calming Room Spray we already had has the added benefit of combating the Stinky Feet Boy Room smell that has a tendency of hanging around sometimes.


VOILA! So far, so good. Bedtimes are much easier these days. 
Unless the Dinosaur Bird has been squawking, that is. I love/hate that bird.

Whew!

Tuesday, November 20, 2012

Glob Paints: a Review

***So I got this GLOB kit as a freebie through NPN - under the impression that I was doing a review/giveaway for them. But I'm NOT doing a giveaway. I do, however, love this little paint kit, so here is my review.****


 I was super excited to do this review - we're big painters around here and the idea of natural pigments that we can mix to our exacting specifications is very appealing. Then I did some research on the company and it just got better and better. They're based in California (where the paints are made) and the company uses only natural, botanical sources: seeds, fruits, vegetables, nuts, etc. The company is also really focused on the community - once a year they give a selected school paints and art supplies to help keep art in the school despite the budget cuts that seem to get deeper every year.

Mixin' it up! 
 We really enjoyed the process - picking the colors (we started with two) and mixing them and then, of course, painting. The consistency was a little hard to get right - I used WAY too much water (I should have read the directions, in retrospect) but we got to see the saturation as I added more pigment to get it right. The pigment bags look like seed packets, which is super cute, and they include a little compostable cup with a lid for each color (you could use condiment cups or ramekins for blending, if you were so inclined.)


   The pigments themselves are gluten-free and vegan, so if you have those concerns, you can breathe easy. It says on the bags that it's neither intended for consumption nor recommended for those under 6, but I wouldn't worry about either of those too much. After all, even the pros eat a little paint here and there. I can't think of anything I would improve - maybe more color options and a better sealing packet for the unused pigment, but those are really minor concerns. Ultimately, these are going on my "excellent gift" list for future gift-giving occasions. Trust me. They are that awesome.   Get your own HERE.

The finished product. Notecards for every occasion!

Friday, October 26, 2012

{Tutorial} Felted Beeswax Candles

This holiday season, we're doing another felted homemade gift - beeswax candles. Super easy, infinitely customizable, and so cute. 

I'm just going to get this out of the way - my inspiration came from here and here. Except my felting technique was taking from here instead of the other. It works for us.


So this was pretty easy and fun and these will be gifts "from the boys." Baz actually did help felt that two that we made for the purposes of this post, and will help with the rest of the jars. Ultimately we'll have twelve.

Here are the tools and skills you'll need for twelve half pint beeswax felted candles.

*12 Half Pint Mason Jars
* 5lbs beeswax - purchase locally or from a variety of etsy stores. I had a schmorgasboard and am actually about a pound short, so I'll be make another order to fill that void.
*candle wicks - I bought mine at Michaels and they were pre-cut to 3.5 inches. You can also buy a large spool and cut it down. 
*Felting Wool. Again - I had a variety. I will say that the wool I bought from a local boutique (now closed - SOB) is far superior to what I got at Michaels, but the wool from Michaels worked just fine so don't stress out. (It's back with the embroidery, if you're looking.)
*Felting needle - not necessary, but nice to have. And you can needle felt a design onto yours, if you're so inclined.
*Optional: essential oils to mix into the wax. I like the smell of pure beeswax, so I left it plain. 


Step one: wrap jars.


However you like, with whatever colors strike your fancy. It won't lay perfectly, and that's ok. It's being made by a person, not a machine. 


I did a bit of needle felting to get the strands to stay in place, but then I ended up dunking it to get it wet before wrapping the whole thing with a stocking.


Yes, we eat popcorn from that bowl. You'll want soapy water (I actually gave a squirt of dish soap on each jar) and you'll want to use actual hose (the toe part) to keep everything in place. Then you just agitate until the fibers tighten up. I also suggest felted with the lid on - to keep the fibers in place so you can close it up later.


While they're drying, put the wax in a pot and turn up the heat. You don't want it too hot (obviously) but too cool and the wax doesn't melt evenly.


I experimented with the pouring of the wax - some I filled up straight away and some I layered in. I found that layering helped keep the wicks straightest. Also - some of the wax has now cracked and caved in a bit, so when I melt the final pound to finish the jars, those will get a dollop on top to even things out.


You could do the wax part first - in fact, the only two jars that were felted before they got waxed are the two below.


So that's it. Given the right circumstances, you could do these in a weekend - counting drying and cooling time. Then just wrap them up and gift them to people who could use a little glow in their lives.

I think I'll be packaging mine with Ashley Ann's "Best Of My Day" calendars.

Happy Crafting!
Related Posts with Thumbnails