Monday, December 17, 2012

On Why I'm Not A Pro...Anything Right Now

I had the pleasure of shooting a friend's Christmas card and newborn photos today. This particular friend is one of my oldest California friends. Her daughters are close enough in age to my sons that I harbor fantasies of calling them my in-laws one day (just kidding. [not really.])

Because we both live in newborn land (and her 'hood also includes graduate school) nothing happens on the timeline we envision. Nothing. Which works out nicely because it meant that neither of us was too bothered when 10am became 11 and then 11:30 and then I finally made the 5 minute drive to arrive promptly at about noon.


Two hours and 242 images later, she has a few keepers and a few that will be great if either of us can muster to time/energy to edit them.


She hadn't hired a pro (and we know some good pros) partly because of budgetary concerns and I understand both sides of that. On the one hand...they're photos. Every gadget on the planet has a camera in it and we tend to want to document every single moment of our lives. Paying hundreds (or thousands) of dollars for photos feels low on the totem of budgetary line-items. I have placed it there myself. We would not have had our Christmas card photo were it not for a lucky opening in the mini-sessions being offered by a friend/pro of ours. On the other hand - you want photos that capture your important moments and sometimes you rearrange and write the check.

But I can see why the pros charge hundreds or even thousands of dollars. When you are the one who has put in the time to learn your craft, the money to learn even more, the money and time to invest in and then master your equipment, and you spend hours with your clients and many more editing... and then you have someone call you to tell you "well, those are nice, but my husband can take those in our living room with a disposable camera..." Well, that makes you want to throw your shoe at them. Or start drinking before your shift at the mall photo studio is over. (Not kidding. That's a direct quote and it was the first time I ever wanted to scream at a client. The photos I got were so beautiful that corporate sent 16x20s to every studio to hang on their walls and put it on their website. It was a rare session where the stars aligned and there was no need for post-processing. In a mall studio. In 2002.

And now I'm looking at 242 images of my friends being thankful that I do not have an editing deadline aside from the casual "let me know if there's one you want me to fix for your card" - I get to take my time with these and enjoy them. I get to be excited at the finished product. I got to stand around and taste olive oil from their Greek trip and hear songs from their 3 year old. My payment was cookies and film (!!) It was a treat and not a job. It is a pleasure and not a chore. Long live the barter system.

The same is true of writing. I write for the Natural Parents Network. For free. Because I love to write, because I believe in their mission, and because (is this redundant?) I love to hand out unsolicited advice.

Here's some:

Read this book.

Listen to this song.

Subscribe to this podcast.

Make any -or all - of these cookies.

Call your mother. ;-)

Find things to do that fill in this blank:

"__________ is like sex. If I like you and you appreciate it, it is free. Otherwise you can't pay me enough."

Happy Holidays!


Tuesday, November 20, 2012

Glob Paints: a Review

***So I got this GLOB kit as a freebie through NPN - under the impression that I was doing a review/giveaway for them. But I'm NOT doing a giveaway. I do, however, love this little paint kit, so here is my review.****


 I was super excited to do this review - we're big painters around here and the idea of natural pigments that we can mix to our exacting specifications is very appealing. Then I did some research on the company and it just got better and better. They're based in California (where the paints are made) and the company uses only natural, botanical sources: seeds, fruits, vegetables, nuts, etc. The company is also really focused on the community - once a year they give a selected school paints and art supplies to help keep art in the school despite the budget cuts that seem to get deeper every year.

Mixin' it up! 
 We really enjoyed the process - picking the colors (we started with two) and mixing them and then, of course, painting. The consistency was a little hard to get right - I used WAY too much water (I should have read the directions, in retrospect) but we got to see the saturation as I added more pigment to get it right. The pigment bags look like seed packets, which is super cute, and they include a little compostable cup with a lid for each color (you could use condiment cups or ramekins for blending, if you were so inclined.)


   The pigments themselves are gluten-free and vegan, so if you have those concerns, you can breathe easy. It says on the bags that it's neither intended for consumption nor recommended for those under 6, but I wouldn't worry about either of those too much. After all, even the pros eat a little paint here and there. I can't think of anything I would improve - maybe more color options and a better sealing packet for the unused pigment, but those are really minor concerns. Ultimately, these are going on my "excellent gift" list for future gift-giving occasions. Trust me. They are that awesome.   Get your own HERE.

The finished product. Notecards for every occasion!

Friday, October 26, 2012

{Tutorial} Felted Beeswax Candles

This holiday season, we're doing another felted homemade gift - beeswax candles. Super easy, infinitely customizable, and so cute. 

I'm just going to get this out of the way - my inspiration came from here and here. Except my felting technique was taking from here instead of the other. It works for us.


So this was pretty easy and fun and these will be gifts "from the boys." Baz actually did help felt that two that we made for the purposes of this post, and will help with the rest of the jars. Ultimately we'll have twelve.

Here are the tools and skills you'll need for twelve half pint beeswax felted candles.

*12 Half Pint Mason Jars
* 5lbs beeswax - purchase locally or from a variety of etsy stores. I had a schmorgasboard and am actually about a pound short, so I'll be make another order to fill that void.
*candle wicks - I bought mine at Michaels and they were pre-cut to 3.5 inches. You can also buy a large spool and cut it down. 
*Felting Wool. Again - I had a variety. I will say that the wool I bought from a local boutique (now closed - SOB) is far superior to what I got at Michaels, but the wool from Michaels worked just fine so don't stress out. (It's back with the embroidery, if you're looking.)
*Felting needle - not necessary, but nice to have. And you can needle felt a design onto yours, if you're so inclined.
*Optional: essential oils to mix into the wax. I like the smell of pure beeswax, so I left it plain. 


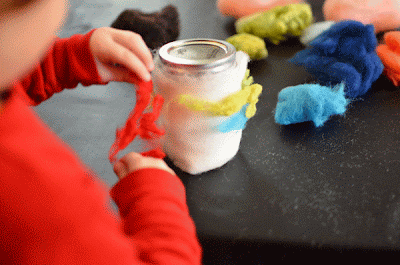
Step one: wrap jars.


However you like, with whatever colors strike your fancy. It won't lay perfectly, and that's ok. It's being made by a person, not a machine. 


I did a bit of needle felting to get the strands to stay in place, but then I ended up dunking it to get it wet before wrapping the whole thing with a stocking.


Yes, we eat popcorn from that bowl. You'll want soapy water (I actually gave a squirt of dish soap on each jar) and you'll want to use actual hose (the toe part) to keep everything in place. Then you just agitate until the fibers tighten up. I also suggest felted with the lid on - to keep the fibers in place so you can close it up later.


While they're drying, put the wax in a pot and turn up the heat. You don't want it too hot (obviously) but too cool and the wax doesn't melt evenly.


I experimented with the pouring of the wax - some I filled up straight away and some I layered in. I found that layering helped keep the wicks straightest. Also - some of the wax has now cracked and caved in a bit, so when I melt the final pound to finish the jars, those will get a dollop on top to even things out.


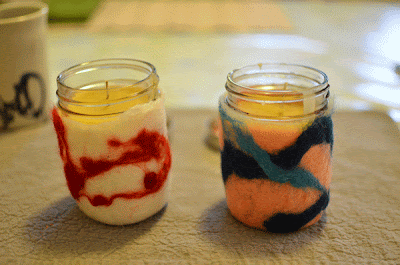
You could do the wax part first - in fact, the only two jars that were felted before they got waxed are the two below.


So that's it. Given the right circumstances, you could do these in a weekend - counting drying and cooling time. Then just wrap them up and gift them to people who could use a little glow in their lives.

I think I'll be packaging mine with Ashley Ann's "Best Of My Day" calendars.

Happy Crafting!

Friday, October 19, 2012

Yogurt Cake!


One of our favorite things to make these days is the yogurt cake from Bringing Up Bebe, a fun little parenting memoir which I thoroughly enjoyed. The recipe is in the book if you're interested, but the key point is that it is measured using single-serving yogurt cups. It's a great introduction to measuring because little ones don't have to remember which lines mean what - the just scoop and pour and stir. (I did the few actual measurements and then stood back and let him do the rest.)


(Yes, you CAN have white and brown chocolate chips!)

(I poured from our awesome batter bowl into the springform - the best pan for the job, imo)


 If you're wanting a recipe to refer to now, this one from Orangette is swoon-worthy. Trust me.

Always document your accomplishments:


Now go bake something yummy this weekend!


Thursday, October 18, 2012

Tuesday, October 16, 2012

In Praise of the Pause

Let me just preface this with acknowledging that a lot of people out there are having French Parents Are Awesome Fatigue, and I respect that.

But Y'ALL - THE PAUSE.

According to Pamela Druckerman, French parents don't sleep train - despite having children who sleep through the night early on (2 months, she says.) What they do, is pause. They just take a moment, when their child stirs, to make sure that awakening is what's happening and not just restlessness.

And I cannot stress enough how much I want to kiss her for sharing that little tidbit. It seems like such a small thing - and something that SURELY everyone knows. Well, you know what happens when you assume, right?

With Baz, the minute I heard noise I rocketed to him like he'd turned on a tractor beam. The result was a baby who never learned how to settle back down between REM cycles and parents who didn't sleep through the night for close to two years.


With Walter, the only thing that's changed is that we Pause now. The crib is still side-carred. He still winds up with his head in my armpit the second half of the night. He nurses on demand, he nurses to sleep, he sleeps on me if he's having a rough time of it (Baz hasn't figured out Quiet Time just yet) but ultimately...he's sleeping through the night and napping like a champ to boot.

Let me clarify that sleeping through the night is a 4-6 hour stretch. And it is AMAZING. The not-so-amazing part is that he goes down between 6:30 and 7:30 and then sleeps until between 11 and 1 and is then up every two is hours after that. 6:30-8:30 seems to be his I'm AWAKE time, and then we get a morning nap and - if Baz cooperates, 2 afternoon naps.


And all I do is Pause. I listen to the quality of his noises and can now (at almost 3 months) tell the difference between the Between Dreams shifting and the Awake and Rooting for Boob shifting. I am always right there and if he starts crying there is definite tractor-beam-like action, but I don't interfere. I trust him to follow the cues his body is giving him, just like he trusts me to provide milk, snuggles, a fresh diaper, or a pat on the back when he needs it.

It's some of that advice that you hear from older generations and tend to blow off until you put it into practice:

Don't Read Books - Read your Child
Don't Watch the Clock - Watch Your Child
Don't Listen to "Experts" - Listen to Your Child.

Well, I did. And everyone benefits.

Also - Husband was right: everyone should have their second child first. This baby thing is a breeze the second time around ;-)

Monday, October 15, 2012

Put A Bat on It

We wanted an easy Halloween craft...and my mantel was feeling a little out of step with the season. And then I was inspired by Portlandia* and Pinterest and decided to put a bat on it.

But tracing a template and cutting out bats is a Mommy job and Baz wanted in on the action. So I cut out pumpkins (construction paper, freehand, glue stick) and some black eyes, noses, and mouths, and let him go.


Oct 12 2012 from Emily Bartnikowski on Vimeo.

Finished product:


*I did not enjoy that show as much as I felt I should. In fact, I enjoyed exactly one segment. This one. (Because it speaks to the part of me that wants to go live at the Pit in PCU.)

Saturday, September 22, 2012

Giveaway: Birth Announcements from TinyPrints — 2 Winners! — $75 ARV {10.6 US/CAN}

This is a joint giveaway with Embrita Blogging and Natural Parents Network. You may enter at one site only. Please find the section marked "Win it!" for the mandatory entry and optional bonus entries.
TinyPrints is offering TWO of our readers a gift certificate for Birth Announcements or other custom stationery items, a value of $75. From our reviewer, Embrita Blogging:


TinyPrints started as 3 friends filling a gap in the market: quality baby stationery. Since then, the company has expanded to offer invitations, announcements, and greeting cards for all occasions as well as gifts and decor and photo books. The process is easy: narrow down your favorites until you pick a design you like, upload your photos, fill in the blanks, and before you know it there's a happy box waiting on your porch. We were expecting our second son in early August and I spent most of July pouring over the offerings on the TinyPrints site to pick the perfect announcement. Both my husband and Baz weighed in with their opinions and we finally landed on a flat square card with a single image on the front and a single image on the back. So here's what I like about the company and the process: there are many, many options and seemingly endless configurations: season, gender, pregnancy, adoption, number of photos, flat or folded (or accordion!)...the list goes on and on. The cards are printed on heavy stock that will hold up to the abuse given by the postal system (I just went with the standard offering, though you can upgrade both paper and coating). Here's what it looks like on their site:


Here's what arrived on my porch:

(That kid is cute, but mine is clearly cuter :))

Looks awesome to me. While I stuck with the default font for this layout, you can change colors and fonts for some of their options.


We did add a photo to the back for good measure (my first choice was to pick an option with multiple images on the front, but I was out-voted). On the one hand, I'm vaguely bothered that the quality of that image is clearly of lesser quality than the one on the front. On the other hand, I don't really care because it's on the back of the card and the card is about Walter, who is so darned cute on the front!

The only thing that really bothered me about some of the card options was that the text wasn't fully customizable. The first card we all agreed on was for a Holiday season baby, even though the colors didn't indicate it as such and there was no way to remove "Happy Holidays!" from the greeting. We went with our second choice, but it would have been nice to simply alter the greeting and send out our first choice.

The final option we were offered was to upload our address book and have TinyPrints print out the envelopes as well (envelopes come free with your order - one envelope per card, with extras available for purchase). You can also have TinyPrints send them out for you. While I see the appeal for things like invitations, I'm old-fashioned enough to want to include notes and hand-sign most (if not all) of our announcements (and holiday cards, when the time comes). (Edited — I have a newborn — handwritten notes did not happen in the interest of getting them in the mail while the child could still be classified as a newborn.)

Overall, I am impressed with the product and the service and will likely use it again. If you've got a baby on the way, certainly enter for a chance to have a bit of your expense covered (babies are expensive!). And if you don't have a baby on the way...there are birthdays and holidays and parties and thank yous and photo books to be had over at their site. Definitely check it out.

BUY IT!

You can purchase your own Birth Announcements at TinyPrints, starting as low as $0.79/card. TinyPrints is also offering a $10 discount on your first order when you subscribe to their newsletter. Be sure to check out their Promotions Page for more coupon codes and deals.

WIN IT!

For your own chance to win a $75 GIFT CERTIFICATE from TinyPrints, enter by leaving a comment and using our Rafflecopter system below. The winner will receive a $75 gift certificate toward the purchase of Birth Announcements or other custom stationery from TinyPrints. Contest is open to the US & Canada.
MANDATORY ENTRY: Visit TinyPrints and tell us another item you like! You must enter your name and email address in the Rafflecopter entry system for your entry to count, after leaving a comment on this blog post.
Leave a valid email address so we can contact you if you win. Email addresses in Rafflecopter are not made publicly visible. Please leave the same valid email address in your mandatory comment so we can verify entries. This is a joint giveaway with Embrita Blogging and Natural Parents Network. You may enter at one site only, and we'll be recording IP addresses to ensure that there are no duplicate entries. That said, please do visit and enjoy both sites!   BONUS ENTRIES: See the Rafflecopter entry system for bonus entries to increase your chance of winning after completing the mandatory entry. All bonus entries are entered directly into Rafflecopter. Give it a try, and email or leave a comment if you have any questions! a Rafflecopter giveaway  

Contest closes Saturday, October 6, at 11:59 p.m. Eastern Time.

 
Disclosure: Our reviewer received a sample product for review purposes. Tiny Prints links are affiliate links. We try to seek out only products we think you would find relevant and useful to your life as a natural parent. If we don't like a product, we won't be recommending it to you. See our full disclosure policy here.
  __________________________________
  Emily just welcomed the newest member of her family and is currently existing in a newborn fog. She writes, creates, cooks, and sings (badly) in sunny Northern California.

Monday, September 17, 2012

A Genius Little Gadget


As you've probably guessed, we're really big on keeping things accessible around here for the under 4ft crowd. 

It's the bit of Montessori that's the most relevant right now and in the parlance of the philosophy, it's referred to as Practical Life.

One of Baz's favorite things to do is turn lights on when we're working in a room and he can reach the kitchen switches, but none of the others. So I purchased some of these bad boys:


Light switch extenders. We started with two: one in his bedroom and one in his bathroom. Then I added two more: one in the hallway and one in his play area (the switch is actually in the office, but it controls the fixture above his table. Our house was built in 1949 and updated in 1969 and has been existing in a state of benign neglect ever since. We don't question things like switch placement lest our heads explode.)

Anyway - they have made all the difference - he can control his environment without needing to either whine at me or drag a chair around my hardwood floors. Everyone wins.


I have yet to find these in an actual store (not for lack of trying) so you'll have to get yours off Amazon, like I did. 

Then sit back and watch your child's sense of confidence and capability grow. Hooray for autonomy!

Friday, September 14, 2012

Crib as Co-sleeper


You can already imagine why I did it, and over at NPN today, I'm telling you how I did it. 

Tuesday, September 4, 2012

Emily vs. the Sewing Machine and the Cookie Monster


I required the use of the internet to make my sewing machine behave. Then I made this apron for Baz...and then we made chocolate chip cookies. 

(fabric here)

I slacked off and use ribbon instead of making ties. I'm ok with that.

Here's a tip for baking with kids: embrace the mise en place. Having everything measured and waiting in individual bowls helps prevent mistakes. It helps with eggshell retrieval, should you need that, too.

Also: measure flour by weight. This is a good rule of thumb anyway, but it's especially true for kids, who tend to pack dry goods into measuring cups with alarming inaccuracy. In order to avoid hockey-puck-like cookies, weigh your flour.


Tip number 2 - hover, but don't interfere without warning, and pose everything you do as helping THEM.  Your goal, after all, is to eventually have fresh cookies just appear before you (and have the kitchen clean, to boot!)


Tip 3 (not pictured): teach the fine art of tidying as you go. If everything is stacked nicely/rinsed/soaking then you can wash up while the cookies are in the oven and have a clean workspace before they've cooled past the scalding state!

These cookies were truly, truly delicious.

Related Posts with Thumbnails